Files, Sorting & Records — The 100-Student Problem
This whole lesson is one problem. Every new thing you learn here shows up because the problem refuses to be solved without it. Cả bài học này chỉ có một bài toán. Mỗi thứ mới bạn học đều xuất hiện vì bài toán không thể giải nếu thiếu nó.
🛠️ Section 0 — Set Up Your Computer
Do this once. Follow the numbered steps in order. Làm một lần. Làm theo các bước đánh số, đúng thứ tự.
0.1 — Install Git Bash
Git Bash is the window where you type commands. Git Bash là cửa sổ để gõ lệnh.
- Go to git-scm.com/install/windows and click "Click here to download". Vào git-scm.com/install/windows, bấm "Click here to download".
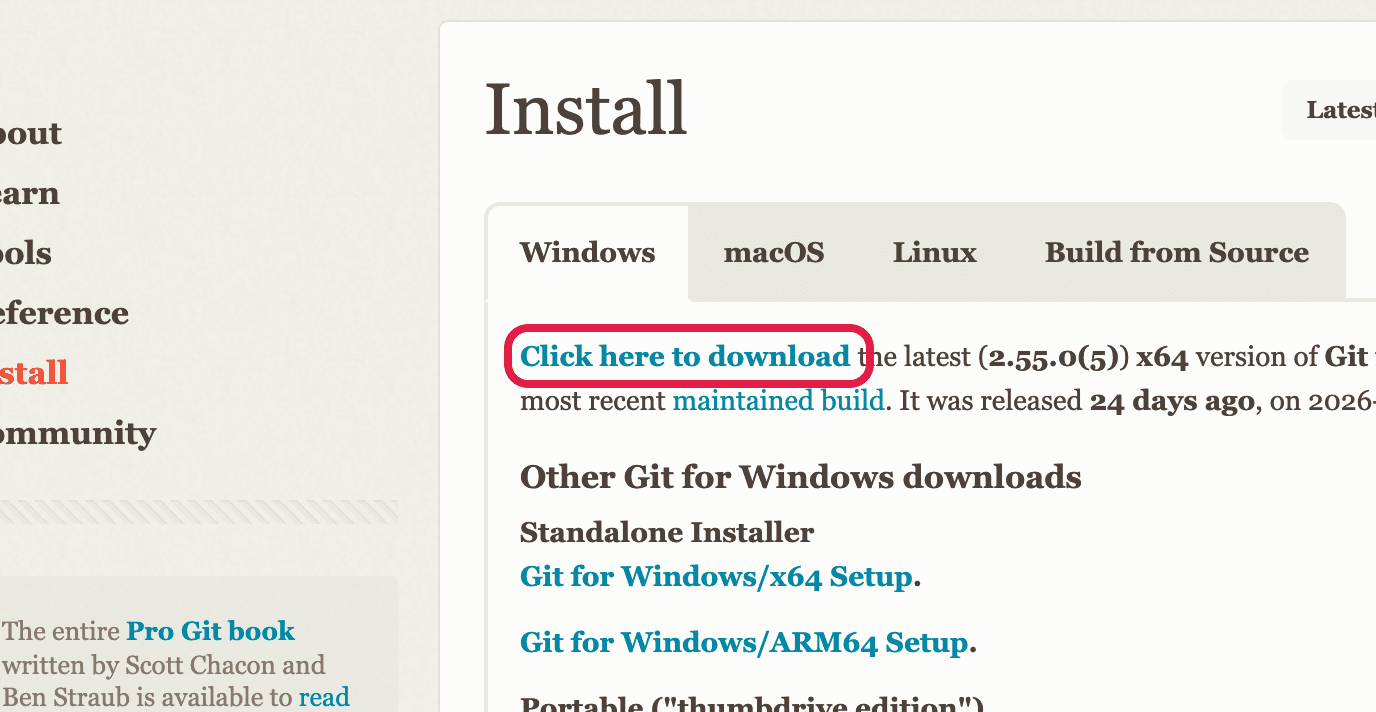
Click the link in the red box. / Bấm liên kết trong khung đỏ. - Open File Explorer → Downloads → double-click the file. Mở File Explorer → Downloads → bấm đúp vào tệp.
- If Windows asks "Do you want to allow this app to make changes?", click Yes. Nếu Windows hỏi, bấm Yes.
- Click Next on every screen, then Install, then Finish. Bấm Next ở mọi màn hình, rồi Install, rồi Finish.
- To open Git Bash: Start → type Git Bash → click it. Để mở Git Bash: Start → gõ Git Bash → bấm vào.

Git Bash. The $ means it is waiting for you to type. / Dấu $ nghĩa là nó đang chờ bạn gõ. (Image: gitforwindows.org)
0.2 — Install the C++ compiler
The compiler turns your C++ code into a program the computer can run. Trình biên dịch biến code C++ thành chương trình máy tính chạy được.
Part A — Install MSYS2 Phần A — Cài MSYS2
- Go to msys2.org and click the link in the red box (it ends with .exe). Vào msys2.org, bấm liên kết trong khung đỏ (kết thúc bằng .exe).
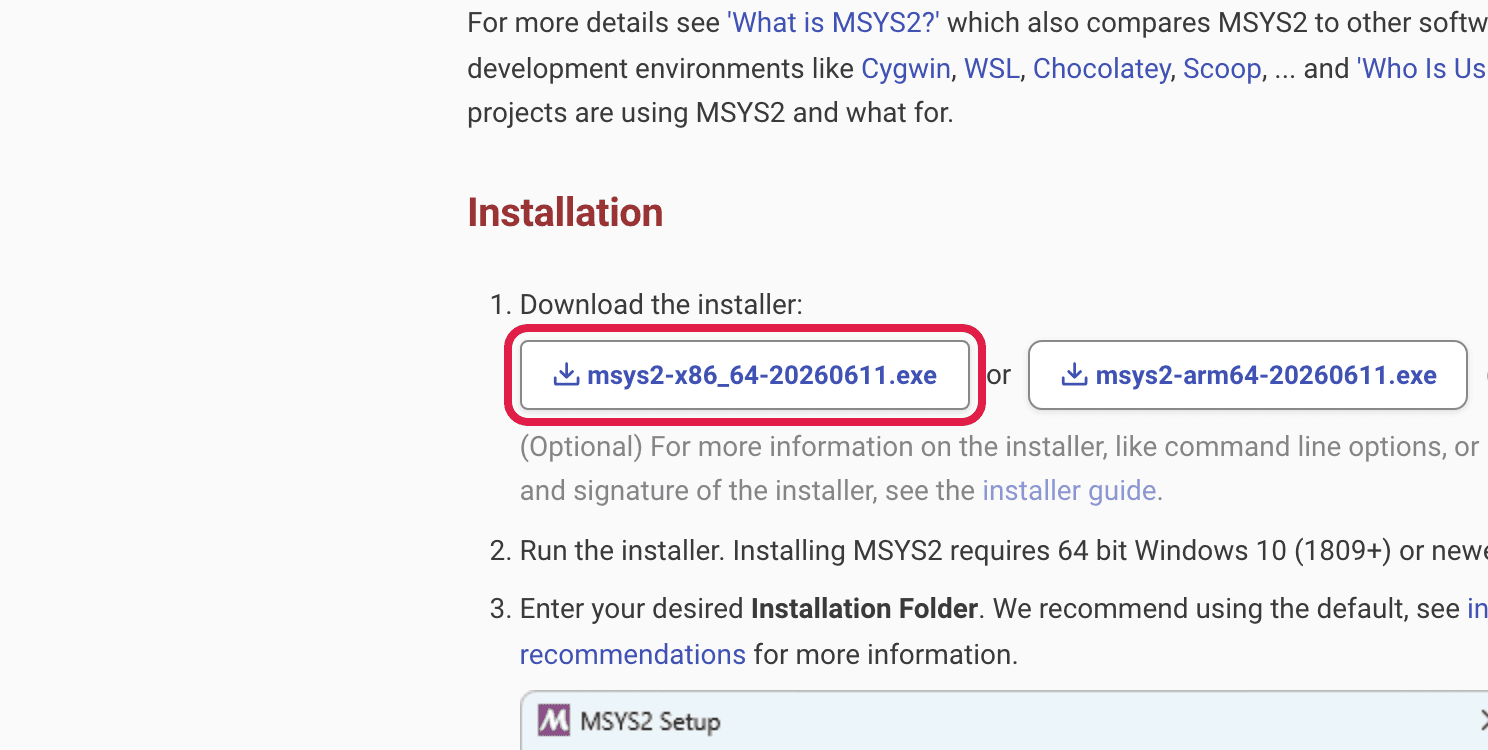
Click the link in the red box. / Bấm liên kết trong khung đỏ. - Open File Explorer → Downloads → double-click the file. Mở File Explorer → Downloads → bấm đúp vào tệp.
- If Windows asks "Do you want to allow this app to make changes?", click Yes. Nếu Windows hỏi, bấm Yes.
- Click Next on every screen. Do not change the folder
C:\msys64. Bấm Next ở mọi màn hình. Không đổi thư mục C:\msys64.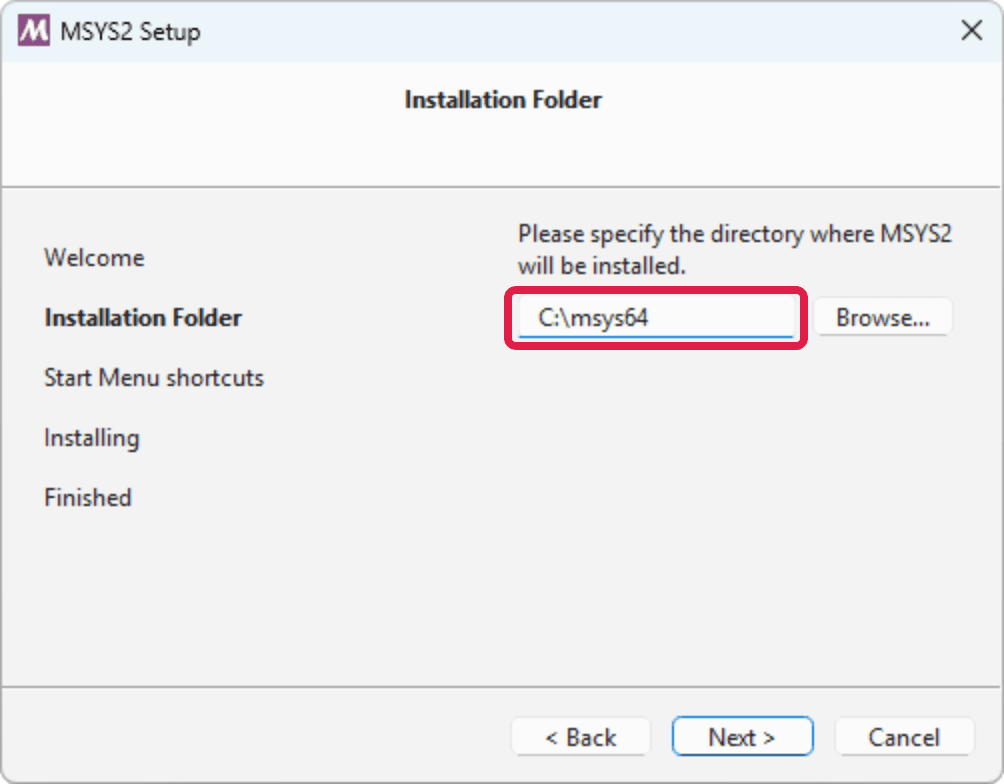
Leave it as C:\msys64. / Giữ nguyên C:\msys64. (Image: msys2.org) - On the last screen, keep "Run MSYS2 now" ticked and click Finish. Ở màn hình cuối, giữ dấu tích "Run MSYS2 now", bấm Finish.
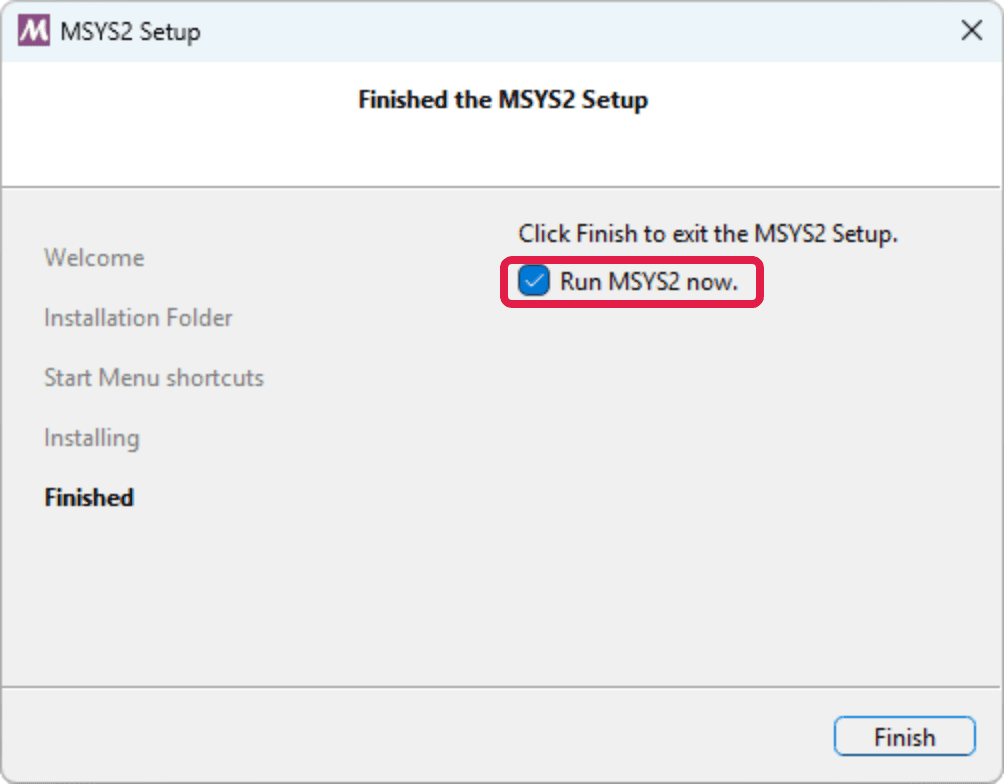
Keep this ticked. / Giữ dấu tích này. (Image: msys2.org) - A black MSYS2 window opens. It is not Git Bash — you use it only now. Một cửa sổ đen MSYS2 hiện ra. Nó KHÔNG phải Git Bash — chỉ dùng lúc này.
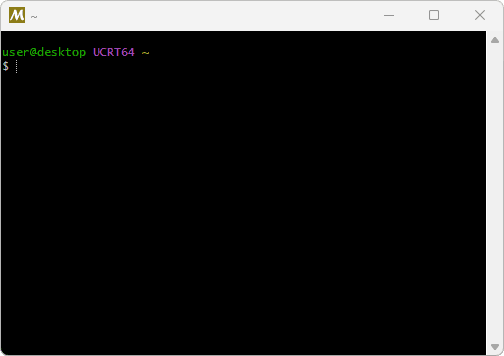
The MSYS2 window. / Cửa sổ MSYS2. (Image: msys2.org) - Copy this line. Right-click inside the black window → Paste (Ctrl+V does not work there). Press Enter. Typing it from paper? There are two dashes before
needed. Sao chép dòng này. Bấm chuột phải vào cửa sổ đen → Paste (Ctrl+V không dùng được). Nhấn Enter. Gõ từ giấy? Có hai dấu gạch ngang trước needed.bashpacman -S --needed base-devel mingw-w64-ucrt-x86_64-toolchain - Each time it asks a question, press Enter. Mỗi lần nó hỏi, nhấn Enter.
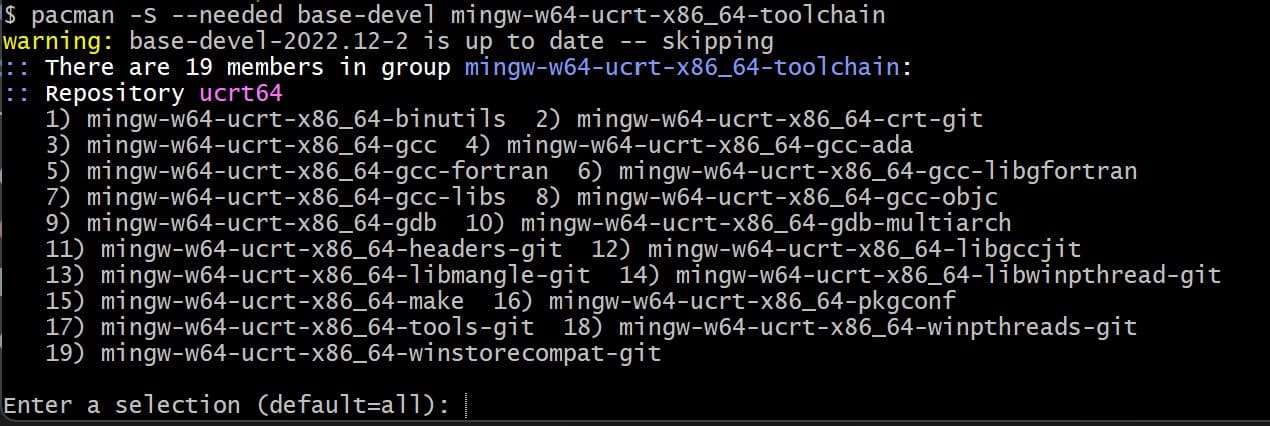
A question like this: press Enter. / Câu hỏi như thế này: nhấn Enter. (Image: VS Code documentation) - Wait while text scrolls for a few minutes. When the last line ends with
$, close the window. Chờ vài phút khi chữ chạy. Khi dòng cuối kết thúc bằng $, đóng cửa sổ.
Part B — Let Git Bash find the compiler Phần B — Cho Git Bash tìm thấy trình biên dịch
- Start → type environment variables → click "Edit environment variables for your account" (not "system"). Start → gõ environment variables → bấm "Edit environment variables for your account" (không phải "system").
- In the top list, click Path → Edit → New. Ở danh sách phía trên, bấm Path → Edit → New.
- Type
C:\msys64\ucrt64\binexactly. Click OK on every window. Gõ chính xác C:\msys64\ucrt64\bin. Bấm OK ở mọi cửa sổ. - Open a new Git Bash. Type this and press Enter: Mở Git Bash mới. Gõ dòng này rồi nhấn Enter:bash
g++ --version - The first line should start with
g++. If you seecommand not found, do steps 1–4 again. Dòng đầu phải bắt đầu bằng g++. Nếu thấy command not found, làm lại bước 1–4.
0.3 — Install VS Code
VS Code is where you write your code. VS Code là nơi bạn viết code.
- Go to code.visualstudio.com/download and click the Windows button. Vào code.visualstudio.com/download, bấm nút Windows.
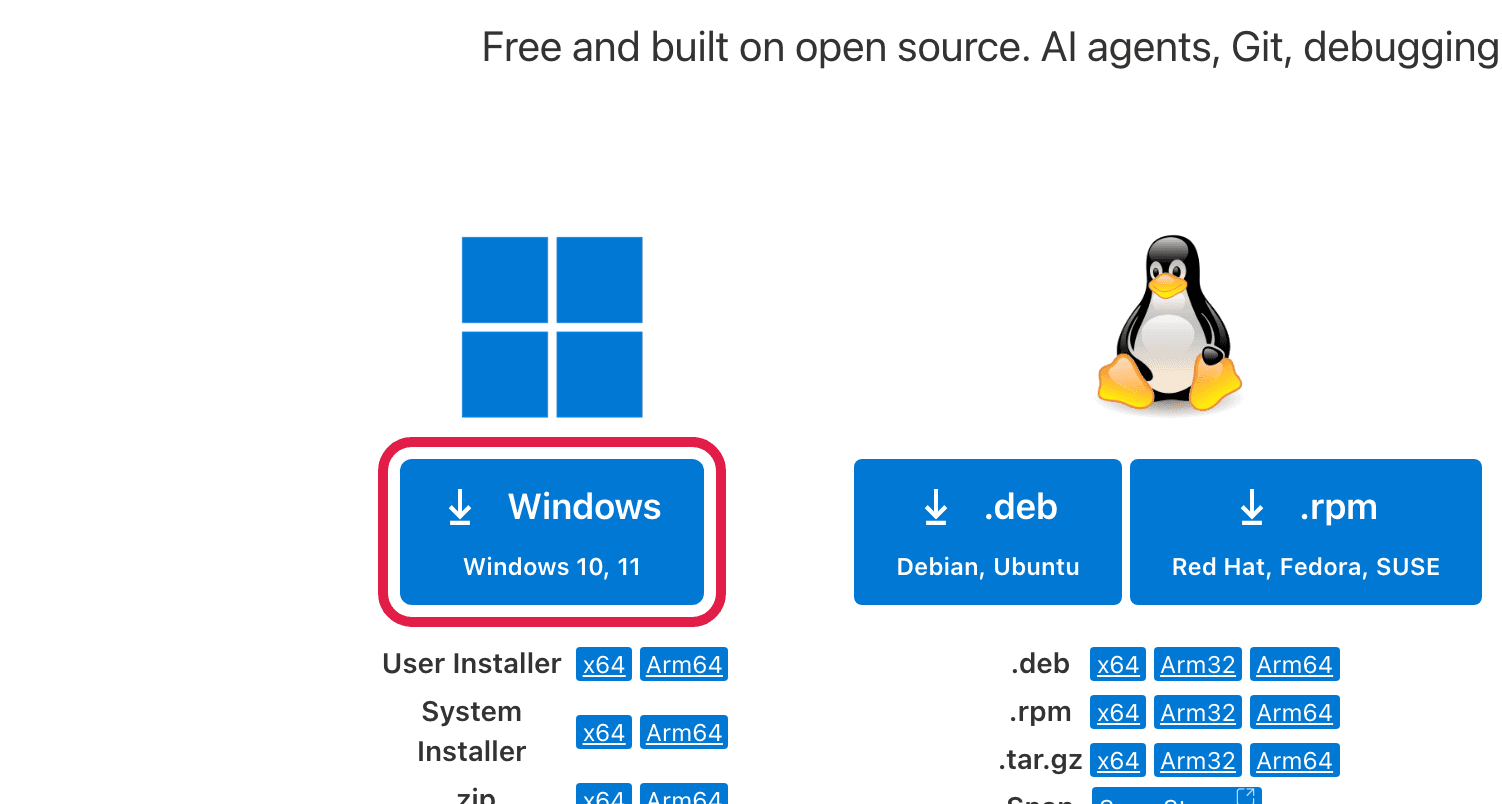
Click the button in the red box. / Bấm nút trong khung đỏ. - Open File Explorer → Downloads → double-click the file. Mở File Explorer → Downloads → bấm đúp vào tệp.
- Click "I accept the agreement", then Next. Bấm "I accept the agreement", rồi Next.
- On "Select Additional Tasks", tick both "Add 'Open with Code'" boxes. Ở màn hình "Select Additional Tasks", tích cả hai ô "Add 'Open with Code'".
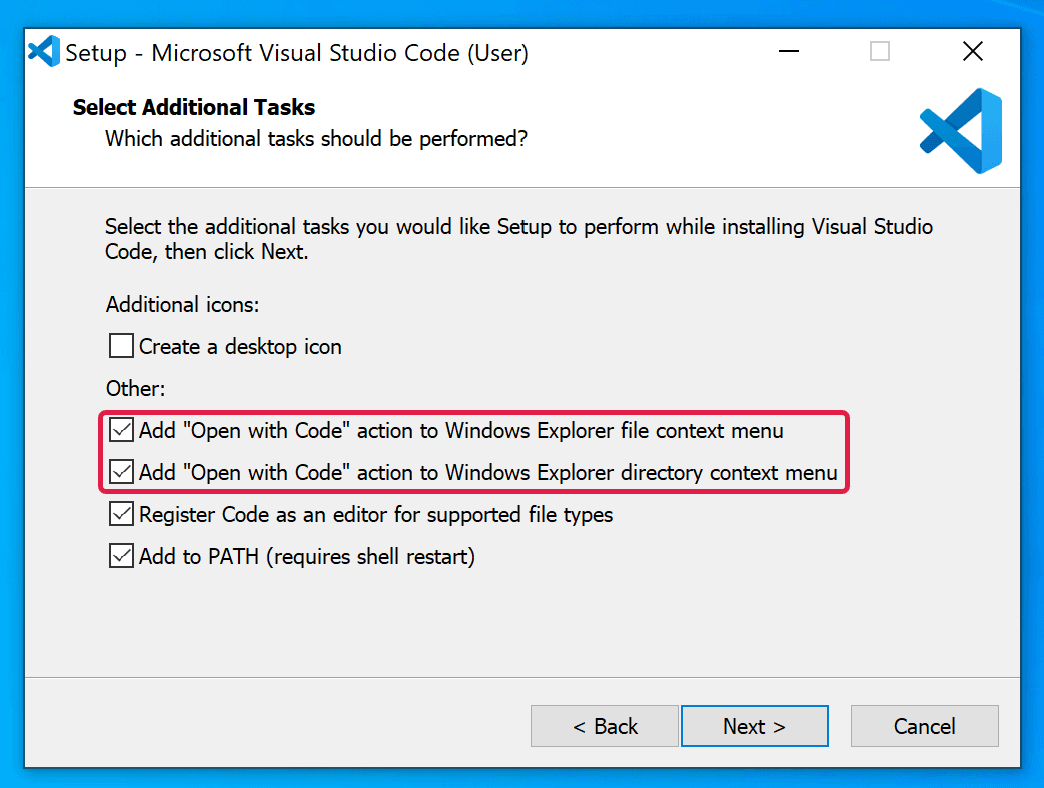
Tick both boxes in the red frame — they start empty. / Tích cả hai ô trong khung đỏ — lúc đầu còn trống. (Image: MIT RACECAR course, MIT License) - Click Next, Install, Finish. Bấm Next, Install, Finish.
0.4 — Make a folder and open it in VS Code
- Open File Explorer → This PC → double-click the (D:) disk. (No (D:) disk? Tell your teacher.) Mở File Explorer → This PC → bấm đúp vào ổ (D:). (Không có ổ D:? Báo giáo viên.)
- Right-click an empty space → New → Folder. Name it with your name — no spaces, no accents. Example: nguyenvanan. Bấm chuột phải vào chỗ trống → New → Folder. Đặt tên bằng tên của bạn — không dấu cách, không dấu tiếng Việt. Ví dụ: nguyenvanan.
- Right-click your folder → Open with Code. (No option? Click "Show more options" first.) Bấm chuột phải vào thư mục của bạn → Open with Code. (Không thấy? Bấm "Show more options" trước.)
- VS Code asks if you trust the folder. Click "Yes, I trust the authors". VS Code hỏi bạn có tin thư mục không. Bấm "Yes, I trust the authors".
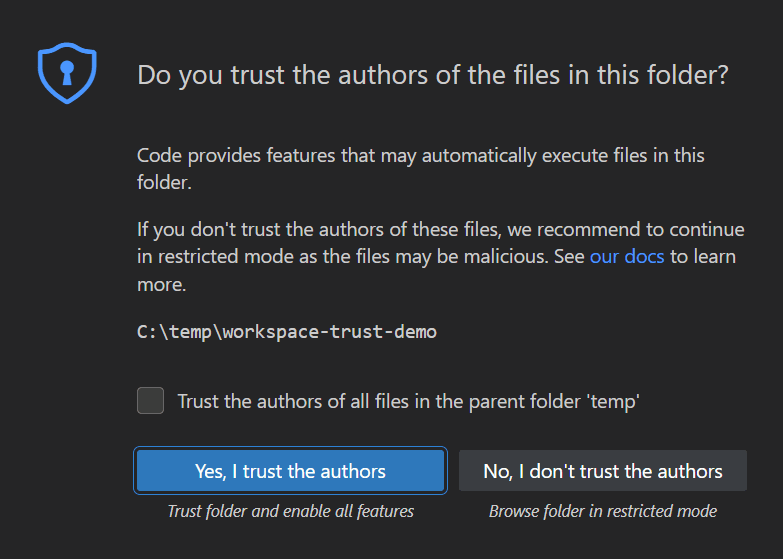
Click the blue button. / Bấm nút màu xanh. (Image: VS Code documentation) - In the left panel of VS Code, right-click an empty space → New Folder.... Type
helloworldand press Enter. All your files for this lesson go in this folder. Ở khung bên trái VS Code, bấm chuột phải vào chỗ trống → New Folder... Gõ helloworld rồi nhấn Enter. Mọi tệp của bài này đều để trong thư mục này.
0.5 — Create your first file
- In the left panel of VS Code, click the helloworld folder. Ở khung bên trái VS Code, bấm vào thư mục helloworld.
- Click the New File button (a page with +). Bấm nút New File (tờ giấy có dấu +).
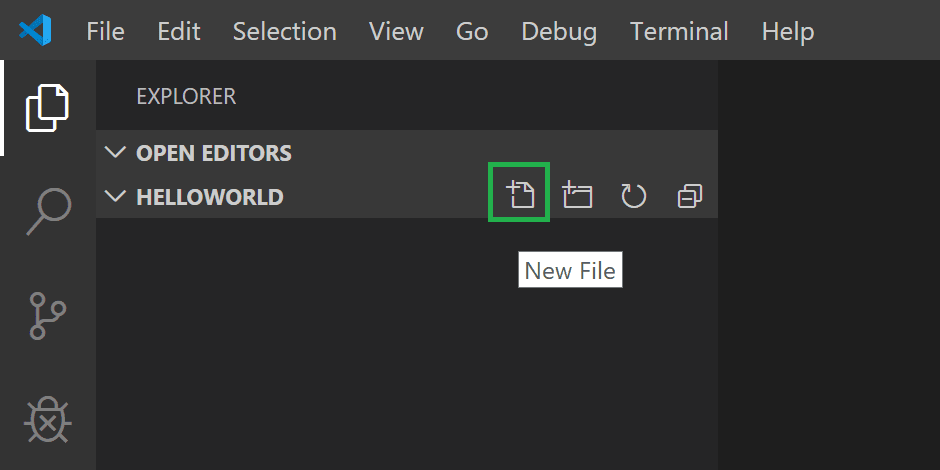
The New File button, in the green box. Yours shows your name on top. / Nút New File, trong khung xanh lá. Của bạn ghi tên bạn ở trên cùng. (Image: VS Code documentation) - Type
hello.cppand press Enter. It appears under helloworld. Gõ hello.cpp rồi nhấn Enter. Tệp hiện ra bên dưới helloworld. - Type this into the file: Gõ nội dung này vào tệp:cpp
#include <iostream> using namespace std; int main() { cout << "Hello" << endl; return 0; } - Press Ctrl+S to save. Nhấn Ctrl+S để lưu.
Always save / Luôn lưu tệp
Press Ctrl+S every time you change a file. Nhấn Ctrl+S mỗi lần bạn sửa tệp.
0.6 — Open Git Bash in your folder
- Close any Git Bash window that is already open. Đóng mọi cửa sổ Git Bash đang mở.
- In File Explorer, open (D:) → your folder → helloworld. Trong File Explorer, mở (D:) → thư mục của bạn → helloworld.
- Right-click an empty space → Open Git Bash here. (No option? Click "Show more options" first.) Bấm chuột phải vào chỗ trống → Open Git Bash here. (Không thấy? Bấm "Show more options" trước.)
- Type
lsand press Enter. Gõ ls rồi nhấn Enter.bashls - You should see
hello.cpp. Bạn sẽ thấy hello.cpp.
0.7 — Compile and run your first file
C++ needs two commands: the first turns hello.cpp into a program (this is called compiling), the second runs it. C++ cần hai lệnh: lệnh đầu biến hello.cpp thành chương trình (gọi là biên dịch), lệnh sau chạy nó.
- Type these two lines, pressing Enter after each: Gõ hai dòng này, nhấn Enter sau mỗi dòng:bash
g++ -o hello hello.cpp ./hello - You should see
Hello. Your computer is ready. Bạn sẽ thấy Hello. Máy tính đã sẵn sàng.
If something goes wrong / Nếu có lỗi
g++prints errors → there is a typo inhello.cpp. Fix it, press Ctrl+S, rung++again. g++ báo lỗi → hello.cpp có lỗi gõ. Sửa lại, nhấn Ctrl+S, chạy lại g++.No such file or directory→hello.cppis not saved in helloworld. No such file or directory → hello.cpp chưa được lưu trong helloworld.
After every change / Sau mỗi lần sửa
Ctrl+S → g++ -o hello hello.cpp → ./hello. If you skip g++, you run the old program. Ctrl+S → g++ -o hello hello.cpp → ./hello. Nếu bỏ qua g++, bạn chạy chương trình cũ.
🎯 Section 1 — The Problem
A class has 100 students. Each one has a score. Your job: print the scores from lowest to highest. Một lớp có 100 học sinh, mỗi bạn có một điểm. Nhiệm vụ: in điểm từ thấp đến cao.
The scores look like this — one number per line, 100 lines in total: Điểm có dạng như sau — mỗi dòng một số, tổng cộng 100 dòng:
87
92
78
95
85
...
Try it first / Hãy thử trước
Start writing the program now, the way you already know: read each score with cin. Keep going until you feel the problem. Hãy bắt đầu viết theo cách bạn đã biết: đọc từng điểm bằng cin. Cứ làm cho tới khi bạn thấy vấn đề.
You found it: typing 100 numbers every single time you test is impossible. Before we can sort anything, we need the data to come from somewhere else. Bạn đã thấy: gõ 100 số mỗi lần chạy thử là không thể. Trước khi sắp xếp, dữ liệu phải đến từ nơi khác.
📂 Section 2 — Read the Scores From a File
The 100 numbers are already in a text file called scores.txt. Your program can read them from the file, so you never type them again. 100 số đã có sẵn trong tệp văn bản scores.txt. Chương trình của bạn đọc chúng từ tệp, nên bạn không phải gõ lại nữa.
Download the data / Tải tệp dữ liệu
scores.txt — 100 scores, one per line. Click the link: the file goes into your Downloads folder. Open Downloads in File Explorer and drag the file into your helloworld folder, next to your program. 100 điểm, mỗi dòng một số. Bấm vào liên kết: tệp sẽ nằm trong thư mục Downloads. Mở Downloads trong File Explorer rồi kéo tệp vào thư mục helloworld, cạnh chương trình của bạn.
cpp#include <iostream>
#include <fstream>
#include <vector>
using namespace std;

int main() {
    ifstream fin("scores.txt");
    vector<int> scores;

    int s;
    while (fin >> s) {
        scores.push_back(s);
    }

    for (int x : scores) {
        cout << x << endl;
    }

    return 0;
}
#include <fstream>brings in the file tools. nạp công cụ làm việc với tệp.ifstream fin("scores.txt")opens the file for reading — the i is for input.finis just a name you picked, like a variable name. If the program prints nothing,scores.txtis not in the same folder. mở tệp để đọc — chữ i là input. fin chỉ là tên bạn tự đặt, giống tên biến. Nếu chương trình không in gì, tệp scores.txt không nằm cùng thư mục.fin >> sreads one number — exactly likecin >> s, but from the file instead of the keyboard. đọc một số, y hệt cin nhưng lấy từ tệp thay vì bàn phím.while (fin >> s)keeps reading until there is nothing left. The loop stops on its own at the end of the file. đọc mãi cho tới khi hết tệp. Vòng lặp tự dừng.
Build one piece, then test it / Làm từng phần rồi kiểm tra
This program does not solve the problem — it does not sort anything. But it compiles, it runs, and you can check it prints all 100 scores. Getting one piece right before adding the next is how you avoid hunting for a mistake in a big broken program. Chương trình này chưa giải bài toán — nó chưa sắp xếp gì cả. Nhưng nó biên dịch được, chạy được, và bạn kiểm tra được là nó in đủ 100 điểm. Làm đúng từng phần trước khi thêm phần sau giúp bạn không phải mò lỗi trong một chương trình lớn.
🔢 Section 3 — Sort Them
The scores are in a vector. C++ can put a vector in order with one line. First add #include <algorithm> at the top of your file, next to the other #include lines. Then: Điểm đang nằm trong vector. C++ sắp xếp vector bằng một dòng. Trước tiên, thêm #include <algorithm> ở đầu tệp, cạnh các dòng #include khác. Rồi:
cppsort(scores.begin(), scores.end());
What are begin() and end()?
Notice that sort does not take the vector. It takes two markers: one for where to start sorting, and one for where to stop. Để ý: sort không nhận vector. Nó nhận hai cái mốc: một mốc chỗ bắt đầu, một mốc chỗ dừng.
scores.begin()marks the first element. đánh dấu phần tử đầu tiên.scores.end()marks one past the last element — not the last one. đánh dấu vị trí NGAY SAU phần tử cuối, không phải phần tử cuối.
You have seen this rule before / Bạn đã gặp quy tắc này rồi
"The end is not included" is the same rule as the loop for (int i = 0; i < 5; i++), which gives you 0, 1, 2, 3, 4 — the 5 is left out. "Không tính điểm cuối" chính là quy tắc của vòng lặp for (int i = 0; i < 5; i++), cho ra 0, 1, 2, 3, 4 — số 5 bị bỏ.
This way an empty vector works too: its start marker and its stop marker are the same, so there is nothing to sort. Nhờ vậy vector rỗng cũng chạy đúng: mốc bắt đầu và mốc dừng trùng nhau, nên không có gì để sắp xếp.
The whole program: Toàn bộ chương trình:
cpp#include <iostream>
#include <fstream>
#include <vector>
#include <algorithm>
using namespace std;

int main() {
    ifstream fin("scores.txt");
    vector<int> scores;

    int s;
    while (fin >> s) {
        scores.push_back(s);
    }

    sort(scores.begin(), scores.end());

    for (int x : scores) {
        cout << x << endl;
    }

    return 0;
}
💾 Section 4 — Write the Answer to a File
Printing 100 lines to the screen scrolls away. Write the answer into out.txt instead, so you can open it and check it. When you run this program, it shows nothing on the screen — that is normal. It creates out.txt in your helloworld folder; open it in VS Code to see the answer. In 100 dòng ra màn hình sẽ bị trôi mất. Hãy ghi kết quả vào tệp out.txt để mở ra kiểm tra. Khi chạy, chương trình không hiện gì trên màn hình — như vậy là bình thường. Nó tạo tệp out.txt trong thư mục helloworld; mở tệp đó trong VS Code để xem kết quả.
cpp#include <iostream>
#include <fstream>
#include <vector>
#include <algorithm>
using namespace std;

int main() {
    ifstream fin("scores.txt");
    ofstream fout("out.txt");
    vector<int> scores;

    int s;
    while (fin >> s) {
        scores.push_back(s);
    }

    sort(scores.begin(), scores.end());

    for (int x : scores) {
        fout << x << endl;
    }

    return 0;
}
ofstream is the writing twin of ifstream — the o is for output. And fout << x works exactly like cout << x, just into the file. ofstream là anh em ghi của ifstream, chữ o là output. Và fout dùng y hệt cout, chỉ khác là ghi vào tệp.
You solved it / Bạn đã giải xong
This is a complete, correct program. It reads 100 scores and writes them in order. Đây là một chương trình hoàn chỉnh và đúng. Nó đọc 100 điểm và ghi ra theo thứ tự.
🔄 Section 5 — New Requirement: Best Student at the Top
The teacher changes her mind. She wants the scores from highest to lowest now. Cô giáo đổi ý. Bây giờ cô muốn điểm từ cao xuống thấp.
With only the two markers, sort always puts the smallest first. To get a different order, you put a third thing inside sort's brackets: a function that answers one question — should a come before b? Chỉ với hai mốc, sort luôn xếp nhỏ trước. Muốn thứ tự khác, bạn đặt thêm một thứ thứ ba vào trong ngoặc của sort: một hàm trả lời câu hỏi — a có nên đứng trước b không?
cpp#include <iostream>
#include <fstream>
#include <vector>
#include <algorithm>
using namespace std;

bool highestFirst(int a, int b) {
    return a > b;
}

int main() {
    ifstream fin("scores.txt");
    ofstream fout("out.txt");
    vector<int> scores;

    int s;
    while (fin >> s) {
        scores.push_back(s);
    }

    sort(scores.begin(), scores.end(), highestFirst);

    for (int x : scores) {
        fout << x << endl;
    }

    return 0;
}
Compared with Section 4, two things are new: the bool highestFirst function above int main() (not inside it), and the sort line now has highestFirst as a third thing. Write highestFirst with no brackets: you are handing the function to sort, and sort calls it for you. So với Phần 4, có hai chỗ mới: hàm bool highestFirst nằm phía trên int main() (không nằm bên trong), và dòng sort giờ có thêm highestFirst. Viết highestFirst không có dấu ngoặc: bạn đưa hàm cho sort, và sort sẽ tự gọi nó.
Read it like this: sort keeps asking your function about pairs of scores. Your function says "a comes first when a is bigger", so the biggest score ends up at the top. Hiểu thế này: sort liên tục hỏi hàm của bạn về từng cặp điểm. Hàm nói "a đứng trước khi a lớn hơn", nên điểm lớn nhất lên đầu.
No equals sign / Không được có dấu bằng
Write > or <, never >= or <=. A comparison with an equals sign confuses sort and your program can crash while running. Chỉ viết > hoặc <, tuyệt đối không >= hay <=. Có dấu bằng sẽ làm sort rối và chương trình có thể sập khi chạy.
This is a real tool / Đây là công cụ thật
The comparison function is not a trick for flipping the order. It is how you control any order you want. You will use it again whenever "smallest first" is not what the problem asks for. Hàm so sánh không phải mẹo để đảo ngược. Nó là cách bạn điều khiển mọi thứ tự, dùng lại mỗi khi đề bài không muốn "nhỏ trước".
🙋 Section 6 — New Requirement: Whose Score Is It?
A list of numbers is not very useful. The teacher wants to know which student got each score. So the data file changes — every line now has a name and a score, for example: Danh sách toàn số thì chưa dùng được. Cô giáo muốn biết điểm đó là của ai. Vì vậy tệp dữ liệu thay đổi — mỗi dòng có tên và điểm, ví dụ:
An 87
Binh 92
Chi 78
Dung 95
Em 85
Download the data / Tải tệp dữ liệu
students-5.txt — only 5 students. Small enough to check every line by hand, so start with this one. chỉ 5 học sinh, đủ nhỏ để tự kiểm tra từng dòng. Hãy bắt đầu bằng tệp này.
students.txt — all 100 students. Use it once your program already works on the small file. đủ 100 học sinh. Dùng khi chương trình đã chạy đúng với tệp nhỏ.
Like before, the files go into Downloads — drag them into your helloworld folder. Như trước, tệp nằm trong Downloads — hãy kéo chúng vào thư mục helloworld.
Reading a line now gives you two things instead of one. You can chain >> to grab them both: Đọc một dòng bây giờ cho bạn hai thứ. Bạn nối >> để lấy cả hai:
cpp#include <iostream>
#include <fstream>
#include <string>
using namespace std;

int main() {
    ifstream fin("students.txt");

    string name;
    int score;
    while (fin >> name >> score) {
        cout << name << " " << score << endl;
    }

    return 0;
}
- The name is text, so it goes in a
string. Using a string means adding#include <string>at the top. Tên là chữ nên lưu trong string. Dùng string thì cần thêm #include <string> ở đầu tệp. - To use the small file, change
"students.txt"to"students-5.txt"in theifstream fin(...)line. Muốn dùng tệp nhỏ, hãy đổi "students.txt" thành "students-5.txt" trong dòng ifstream fin(...).
Now you finish it / Bây giờ đến lượt bạn
Write the whole program yourself: write every student into out.txt, each name next to its score, in the same order as the file. Use the small file of 5 students first so you can check every line by hand. Hãy tự viết cả chương trình: ghi mọi học sinh vào tệp out.txt, tên cạnh điểm, đúng thứ tự trong tệp. Dùng tệp nhỏ 5 học sinh trước để tự kiểm tra từng dòng.
With students-5.txt, your out.txt should be exactly this: Với students-5.txt, tệp out.txt của bạn phải đúng như sau:
Tuyet 60
Cong 53
Hai 67
Loan 90
Khai 95🧩 Section 7 — Keep the Name and the Score Together
The last requirement: write the students from the lowest score to the highest, each name still next to its score. Yêu cầu cuối: ghi học sinh từ điểm thấp nhất đến cao nhất, tên vẫn nằm cạnh điểm.
Try it first / Hãy thử trước
Start from your section 6 program and add sorting. Use students-5.txt so you can check every line by hand. Do not read on until you have tried. Bắt đầu từ chương trình phần 6 và thêm sắp xếp. Dùng students-5.txt để tự kiểm tra từng dòng. Đừng đọc tiếp khi chưa thử.
With students-5.txt, your out.txt should be exactly this: Với students-5.txt, tệp out.txt của bạn phải đúng như sau:
Cong 53
Tuyet 60
Hai 67
Loan 90
Khai 95
Here is a way that works. It uses what you already know — reading, sorting, writing — with one change. Đây là một cách làm đúng. Nó dùng những gì bạn đã biết — đọc tệp, sắp xếp, ghi tệp — chỉ khác một chỗ.
Instead of putting an int in the vector, put a pair of things in the vector. C++ calls it a pair, and you say what the two parts are: Thay vì bỏ một int vào vector, hãy bỏ vào một cặp. C++ gọi nó là pair, và bạn khai báo hai phần đó là gì:
cppvector<pair<int, string>> data;

data.push_back({score, name});
pair<int, string>means the first part is anint(the score) and the second part is astring(the name). pair<int, string> nghĩa là: phần đầu là int (điểm), phần sau là string (tên).{score, name}makes one pair from the two values. {score, name} ghép hai giá trị thành một pair.
The whole program: Toàn bộ chương trình:
cpp#include <iostream>
#include <fstream>
#include <vector>
#include <string>
#include <algorithm>
using namespace std;

int main() {
    ifstream fin("students.txt");
    ofstream fout("out.txt");
    vector<pair<int, string>> data;

    string name;
    int score;
    while (fin >> name >> score) {
        data.push_back({score, name});
    }

    sort(data.begin(), data.end());

    for (auto& p : data) {
        fout << p.second << " " << p.first << endl;
    }

    return 0;
}
When C++ sorts pairs, it compares the first part first. The score is the first part, so the vector comes out in score order — and the name is carried along, because the name and the score are one single value. Khi sắp xếp pair, C++ so sánh phần đầu tiên trước. Điểm là phần đầu, nên vector được sắp theo điểm — và tên đi theo cùng, vì tên và điểm là một giá trị duy nhất.
Reading a pair back / Lấy lại hai phần
A pair calls its two parts .first and .second. Here .first is the score and .second is the name, because that is the order you built it in. Pair gọi hai phần của nó là .first và .second. Ở đây .first là điểm, .second là tên, vì bạn đã tạo theo thứ tự đó.
🔍 Section 8 — What Actually Changed
Put the section 4 program and the section 7 program next to each other: Đặt chương trình phần 4 và phần 7 cạnh nhau:
- Reading —
fin >> sbecamefin >> name >> score. đọc — đọc thêm tên. Changed. / Có thay đổi. - Storing —
vector<int>becamevector<pair<int, string>>. lưu — vector int thành vector pair. Changed. / Có thay đổi. - Sorting — the same sort line; only
scoresbecamedata. sắp xếp — vẫn là dòng sort đó, chỉ đổi tên scores thành data. Not changed. / Không đổi. - Writing — one value per line became two. ghi — một giá trị mỗi dòng thành hai. Changed. / Có thay đổi.
The requirement that looked like it broke everything left the sorting completely alone. That happens when each part of a program does one job: a change usually hits some parts and misses others. Yêu cầu tưởng như phá vỡ mọi thứ lại không đụng gì đến phần sắp xếp. Điều đó xảy ra khi mỗi phần của chương trình chỉ làm một việc: một thay đổi thường chỉ ảnh hưởng vài phần.
✏️ Section 9 — Exercises
Every exercise has its own input file. Click the file name next to the question, drag the file from Downloads into your helloworld folder, and use that file name in your program — for exercise 1, ex1.txt. Exercises 1–4 have one score per line; exercises 5–8 have a name and a score. Mỗi bài tập có tệp dữ liệu riêng. Bấm vào tên tệp cạnh câu hỏi, kéo tệp từ Downloads vào thư mục helloworld, và dùng đúng tên tệp đó trong chương trình — với câu 1 là ex1.txt. Câu 1–4 mỗi dòng một điểm; câu 5–8 mỗi dòng một tên và một điểm.
- Print how many students are in the file. In ra số học sinh có trong tệp. ex1.txt
- Print the highest score, without sorting. In điểm cao nhất, không được sắp xếp. ex2.txt
- Print the average score. In điểm trung bình. ex3.txt
- Write the scores from highest to lowest into
out.txt. Ghi điểm từ cao xuống thấp vào tệp out.txt. ex4.txt - Print every student in the same order as the file, name then score. In mọi học sinh theo đúng thứ tự trong tệp, tên trước rồi đến điểm. ex5.txt
- Print only the students who passed (score ≥ 50), lowest to highest. Chỉ in học sinh đạt (điểm ≥ 50), từ thấp đến cao. ex6.txt
- Print the three lowest scorers with their names. In ba bạn điểm thấp nhất kèm tên. ex7.txt
- Homework: print the students in alphabetical order by name. Bài tập về nhà: in học sinh theo thứ tự bảng chữ cái của tên. ex8.txt